#32 Antique church chairs

Transformation expenses: About $20

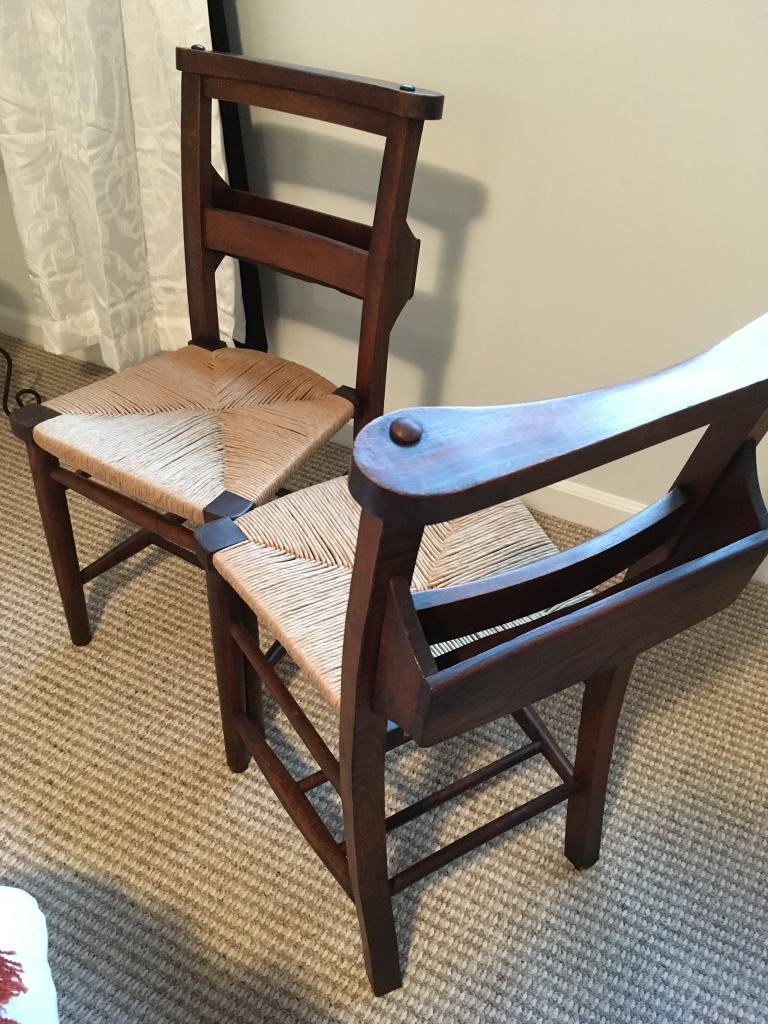
I nearly ignored these chairs thinking they were children’s furniture. Thank God I was sufficiently intrigued by the bible backs to pick them up! I quickly discovered they are antique church chairs, probably made in England in the late 19th century. The frames were dirty but in good condition, and responded beautifully to some simple restoration. A replacement plug and some newly woven rush seats completed their transformation to gorgeous accent chairs with a rich history.

It is likely these chairs were made in England by a company called West & Collier. They look just like chair # 112b from the company’s catalogue of the time. West & Collier was founded in 1869 in a village named Frieth in Buckinghamshire, England. The wood is probably elm and the two extra spindles between the back legs would have been for stowing a gentleman’s top hat during service.

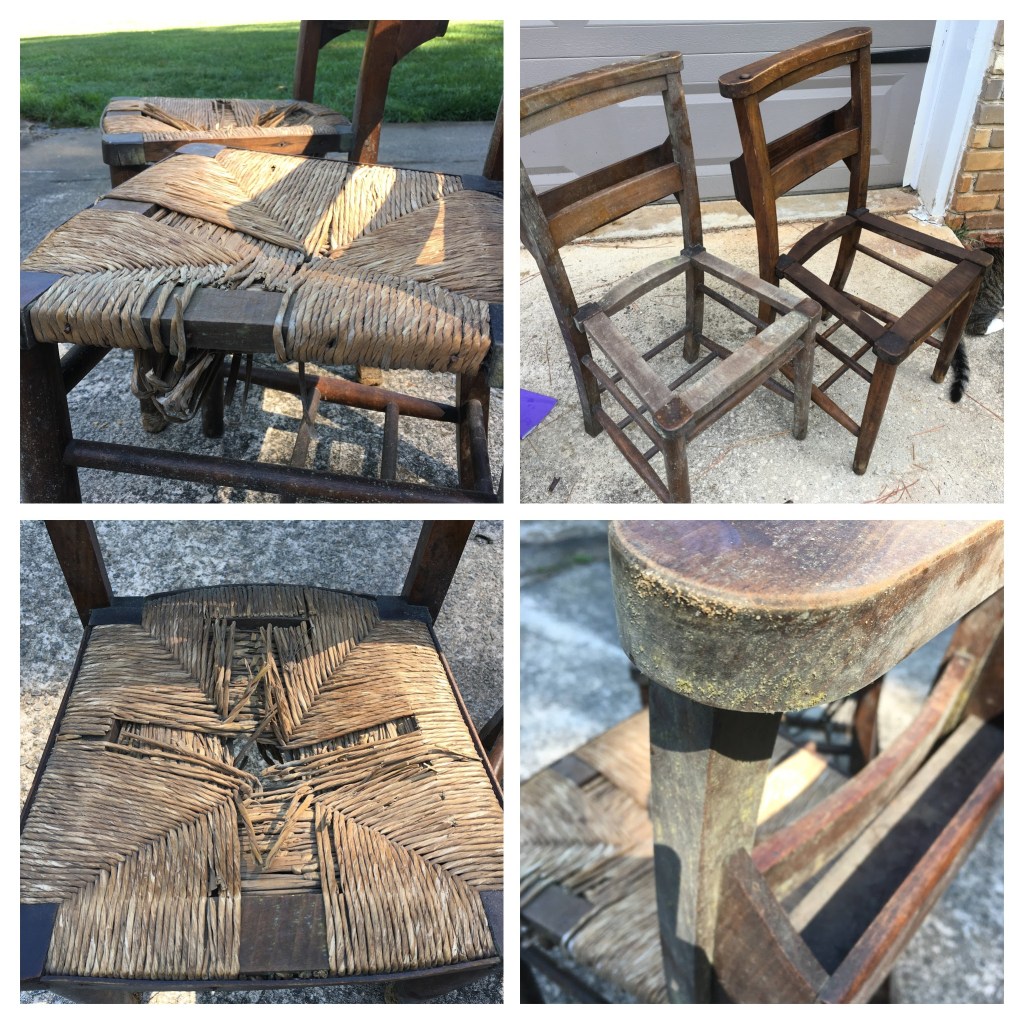
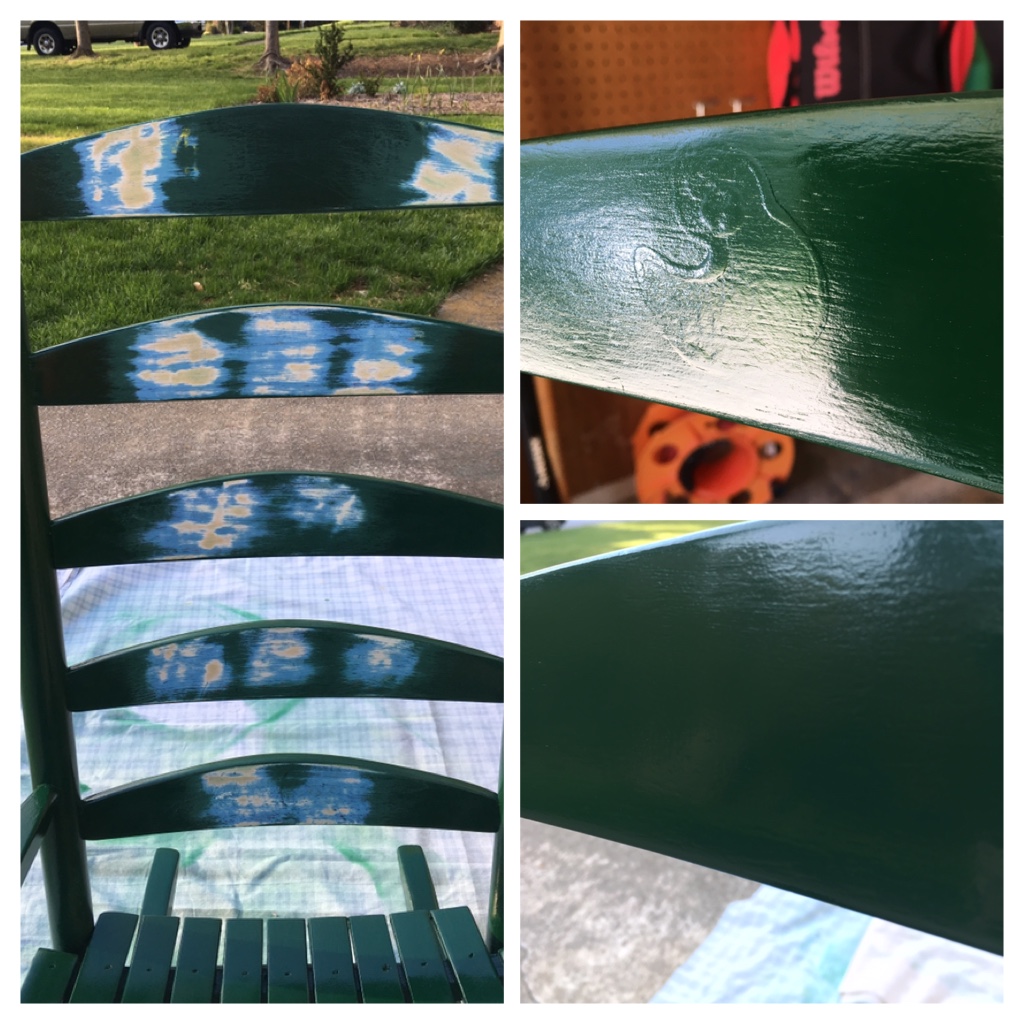
The chair frames were dirty but in good condition, while the rush seats were both damaged beyond repair. I began my restoration by removing the old rush and cleaning the frames with a very dilute solution of Simple Green all purpose cleaner.

After cleaning (bottom right), I applied Howard Restor-A-Finish in walnut (top right), and then Howard Feed-N-Wax (bottom left)

With the frames nicely restored I was ready to weave some new fiber rush seats. This was my second time using a technique I learned from an incredible instruction video by Ed Hammond of Peerless Rattan. I chose to not finish the woven rush with shellac because these seats will be indoors.

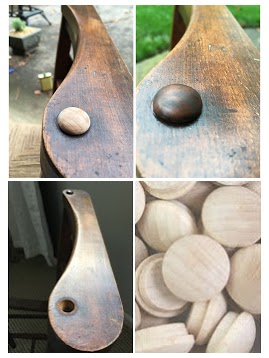
The final step of this restoration was to replace the missing button top wood plug. I got the part I needed from Widget Co. With a little sanding, I was able to make it fit like a glove and have the more rounded-off look of the originals. Once in place I used a mix of Varathane stains (dark walnut and kona) to give it the right color and antiqued look.

#31 The Sophia desk

Transformation expense: About $35

This was my first transformation done with an apprentice and it was a baptism of fire for 9-year old Sophia! By the end we had applied eight coats of paint and wax to this piece! The hurdles we had to overcome were good teaching moments, and the end result was well worth all the effort. My design inspiration was a refinished piece by The Resplendent Crow.

This desk is solid wood, and has some decent joinery, but had also seen its fair share of wear and tear.

Rolling up her sleeves, Sophia got to work cleaning the desk inside and out. We then sanded and used wood filler to repair the biggest imperfections, including a crack in the top.

Sophia chose a beautiful, pale blue color (Permafrost) for the Behr Chalk Paint. We applied the first coat and immediately ran into two serious problems: 1) When the desk was moved, the crack in the top re-opened and 2) Stain from the sanded surface was bleeding through the paint causing yellowing.

Fixing the recurring crack was made harder because the top could not be removed (a couple of wood wedges were gluing it firmly in place). To install a metal bracket across the joint I had to drill pilot holes down through the desktop because I couldn’t get a drill in from the underside. Once the stabilized crack and pilot holes were filled and sanded, we could move on to problem #2.

A couple of coats of Kilz oil-based primer sealed the surface and prevented any further bleeding of the stain.

Now we could go back and apply three coats of the beautiful pale blue chalk paint.

When the painting was finished we decided to take this desk to the next level by adding some stenciling to the top.

Two coats of clear wax give protection and a beautiful sheen to the finish.

Tea break!

Finally we were ready for the finishing touches: We removed all the painter’s tape, polished the whole surface to a lovely sheen, and re-installed the hardware, which had been cleaned and painted in Rust-Oleum white semi-gloss spray paint.

#30 Picture frame jewelry board

Transformation expenses: $35.74

A while ago we hired a dumpster during a landscape project. When neighbors threw in a perfectly good picture frame I grabbed it knowing it would be good for something. Months later some friends and I were browsing quaint shops after a lovely afternoon tea. One friend saw a jewelry board that she particularly liked and I offered to create something similar with this frame.

Keeping costs to a minimum was the biggest challenge on this project. For my design I needed:

  • 5/8″ dowel rod & plywood
  • Leather cord & 1 yd fabric
  • Decorative tacks & cup hooks
  • Wooden decorative appliques

Fortunately I already had these things left over from previous projects:

  • Spray paint
  • Clear, dark & metallic wax
  • Thin batting
  • Beads & craft paper

The frame was rather uninteresting so I embellished it with wooden appliques and a layering of paints and waxes. The frame, appliques and doweling were first painted with Rust-Oleum 2X Ultra Cover in Antique White. I also painted the brass cup hooks with Rust-Oleum Hammered spray paint in dark bronze.

I then applied clear wax, followed by dark wax, followed by Amaco Rub ‘n Buff metallic wax in Spanish Copper.

Meanwhile I wrapped the plywood with thin batting followed by a neutral fabric.

I secured the prepared plywood into the frame using panel pins. I then cut four equal strips of leather cord for hanging earrings. I punched holes in each end of them all and pairs of holes at intervals along two of the strips (for earrings with posts). These were then nailed to the board using decorative tacks and a bead as a spacer. For bracelet storage I attached a length of the painted doweling using the two painted cup hooks. Finally, more decorative tacks function as hangers for necklaces. The back of the frame is finished with craft paper and a pair of D-hooks for hanging.

#24 Salzburg mirror

Transformation cost: $24.85

This transformation was made possible by the demise of an earlier one; I was getting ready to give TT#12 (Bevelled mirror with ornate frame) another new look when I accidentally damaged the frame. It was a long shot whether a repair would be possible, so when a neighbor was discarding this piece, I snatched it up. The glass in this piece needed replacing but by a stroke of luck the glass in TT#12 was the exact same size! I was able to use the glass from the damaged frame in the new frame.

In places the mirror coating on this glass was damaged, so I began by removing it from the frame.

I then cleaned the back and front of the frame, including removing the pasted-on backing paper and the black adhesive/caulk that had been used to attach the glass.

A couple of coats of Kilz primer were followed by two coats of the same Benjamin Moore satin latex paint I used on my dining room walls.

Gloss lacquer over the paint gave the frame the finish I was looking for.

Finally it was time to put glass back into the frame. A thin layer of cardboard and a new piece of hardboard atop the glass are kept in place with glazing points and panel pins; no need for glue or caulk. A second piece of thicker cardboard pads out the rest of the space and is finished off with some craft paper and hangers.

#22 Queen bed

Transformation cost: $30.07 (disclaimer at bottom of page)

Ordinarily I would not take on a piece this big due to space restraints. However when my son moved into a student apartment, taking his bed with him, we found ourselves with a guest bed void at the same time that a neighbor was discarding this piece. It turns out this bed has a delightful history: Apart from being the owner’s childhood bed it also accompanied her and her husband to England when he was stationed there for a while. It seems fitting for an Englishwoman to be responsible for its make-over.

Step 1: The habitual cleaning.

Step 2: Sanding. Although sanding is not necessary when using chalk paint, this piece had some chips and dents that I wanted to smooth out.

Step 3: Painting. Once the piece was properly prepped I began applying Annie Sloan’s Paris Grey chalk paint.

Step 4: Distressing. After 3 coats of chalk paint I used fine sandpaper (400 grit) and a light touch to GENTLY distress the contoured parts of the bed. I deliberately was not heavy handed because I want this piece to look like it belongs in a chateau not a farmhouse.

Step 5: Waxing. I then applied 2 coats of clear wax, buffing after each coat. The piece now has a lovely waxy sheen instead of a flat finish. Isn’t it amazing how different this grey looks in the morning light?

The very last thing I did was to go back with some dark wax to add a trace more texture. You can barely see the darker wax which was my intention; again I didn’t want it looking too rustic. Applying dark wax so lightly is not as straightforward as you might think. When it first goes on it is very distinct. The way to cut it back is to have some clear wax and a clean, dry cloth on hand. Once the dark wax is on use a different brush to apply clear wax on top and blend. If there is still more distinction than you want take the cloth and simply rub it off until you get the coverage you want.

DISCLAIMER: The cost shown above is the cost to me which (especially on chalk paint projects) is often less than market price. This is because I always have left-over materials from previous projects. For example: On this piece I used a negligible amount of Annie Sloan dark wax that I already had. The cost of a small can of that wax is $17 but I did not factor it into this project.

#21 Hekman coffee table

Transformation cost: $20.50

When a neighbor was discarding this table I almost didn’t take it because it is large and heavy and I was short on storage space. I’m glad I changed my mind because it is going to be perfect for the large living room my son will have in his shared apartment. Also, it’s incredibly robust so will hopefully withstand the wear and tear from four 19-year old boys.

Markings on the underside of the table quickly revealed its distinguished heritage. Despite knowing the manufacturer and serial number, my internet searches for more information have been fruitless. However, I will rest with the knowledge that a similar Hekman coffee table would today cost upwards of $500, and that “Now, almost a century old, Hekman is widely recognized as one of America’s premier furniture suppliers.” (excerpt from http://www.hekman.com/our_history)

Removing the worn and damaged finish on the table top was my first priority. Once I had also cleaned the legs with a mild soap solution, the piece was ready for its new finishes.

First was Annie Sloan “Coco” chalk paint. I applied three coats to the legs.

I then sealed the chalk paint with one coat of clear wax. Once it was dry and buffed, I applied a second coat of clear wax, followed by Annie Sloan dark wax. By working the brush and using more clear wax as needed, I got exactly the look I was going for. Once it was dry, I finished by buffing the legs one more time.

For the table top I began by applying a coat of MinWax stain & polyurethane in honey satin. I had intended to finish the piece with one or two more coats of this product, but changed my mind. I so liked the look of it after just one coat I decided to switch to an oil-based, clear, satin polyurethane to finish the job.

Two coats of clear, satin polyurethane gave the piece the protection and sheen it needed

#20 Bar stool bistro table

Transformation cost: $26.05

Part 1 of a 2-part transformation this bar stool-looking thing was acting as base for a larger, round table top. It could have become many things but its fate was sealed when I temporarily stored it on my front porch and realized it is perfect as the bistro table we needed. I probably could have bought a small table for about the same price but this way I have the satisfaction of knowing I made it and it didn’t get trashed! Part 2 will be the transformation of the table top piece.

Once separated from the particle board table top this base was ready for its stand-alone transformation. After sanding and cleaning, the legs were ready for a paint finish that would complement our porch furniture and decor.

I chose Rust-Oleum metallic oil-rubbed bronze because I had previously used it to freshen up our porch light casings. NOTE TO SELF: This paint clogs easily and I wasted some partial cans because they would no longer spray.

Once I had created a paper template for the top I was ready to take the tiling plunge. I started by sticking a single row of tiles to the rim. Meanwhile I laid out the design for the top on my paper template. I used wheeled mosaic nippers to cut some square tiles in half for the center of the design.

I let the rim dry for 24-hours before I applied the tile design to the top of the table. The old table top and some cookbooks made a handy weight to encourage everything to set level.

The next day I grouted everything with a pre-mixed grout in alabaster color.

To finish the top I applied one coat of mosaic grout sealer to protect against red wine and coffee!

The finished piece goes perfectly on our front porch and is just the right size for front porch essentials!

#18 Rocking chair

Transformation cost: $26.53

This was a bittersweet transformation; on the one hand it was slightly heartbreaking to eradicate the bespoke finish that had been lovingly and expertly applied by a parent; on the other hand the chair was ready to move on and it rocks its new sophisticated, tropical look.

Since the previous finish was a textured one, it first needed a thorough sanding. Without spending days on it I wanted to get the surface as smooth as possible as it would be getting a gloss finish that would show every little defect. After sanding with three different grit papers I gave the chair a good clean with a mild detergent solution.

Beginning with the underside I started applying Rust-Oleum UltraCover spray paint in gloss hunter green. When several coats were thoroughly dry I applied felt pads to the rockers to protect the finish and any flooring it would eventually stand on.

When I started painting the topside my fears were realized. Despite having done what I’d hoped was enough sanding, the outline of the ducks was still visible through the new finish. More sanding and more coats of paint did the trick. Ducks gone!

With the paintwork complete I now needed to revamp the cushion. Using the unpicked old cover as a pattern I cut and sewed a fashionable indoor/outdoor palm print fabric into a new cover.

When chair and cushion were re-united my vision was realized

#17 Lampshade hanging baskets

Transformation cost: $31.18

Despite knowing right away what I wanted to do with them it has taken over a year to get around to it. Although the shades were intact they were quite badly stained and were ready for a new lease of life. This transformation was fairly pricey but for a pair of hand-crafted baskets that will add character to my garden I think it was worth it. I can hardly wait to see them overflowing with flowers this summer 😍.

My first job was to strip the shades down to the bare metal frame. After removing all the fabric I was left with binding tape firmly attached to the top and bottom rims. Soaking it in water softened the glue enough to pull off the tape and get the frame clean.

Using branches as paint stands,  I applied several coats of Rust-Oleum Metallic Antique Brass to the shades.
I chose this color to match the artisan wire I would be using later.

Now I needed to add more structure to the frames to support the coco liners, soil and plants that would go inside. I attached two strands of 18 gauge antique brass artisan wire to the frames; one at the top and one at the bottom. By repeatedly drawing the two wires together in middle, threading them through a ceramic bead then wrapping them back around the rims, I created a diamond pattern with a bead in the center of each opening.

To finish them off I made bases by cutting discs from leftover pegboard. This will hopefully stop the bottom from falling out when they are planted. Finally I added black hanging chains found at Dollar Tree.

#13 Sash window picture frame

Transformation cost: $30.62

This window was truly a labor of love. After 10 months in my gazebo it finally got the attention it deserved but it took a very long time to remove the panes of glass, scrape away old putty and sand the woodwork. On a positive note, the multiple layers of paint that had been applied over the years offered up a rich layering effect when it was heavily distressed.
Having recently paid $$$s for a couple of professional framing jobs this transformation was well worth the effort!

The first job was to painstakingly remove the hardware, metal stripping and all 6 panes of glass.
Only 4 of the panes survived!

With the wood frame stripped of all its accessories it was time for the first good scrub with a weak soap solution to remove months of build up.

Starting with 80 grit and finishing with 220 grit sandpaper I distressed the clean frame. I wanted to keep a rustic look to the piece and didn’t intend to apply any paint so I worked to expose all the different layers of paint and some of the wood. Once I had the look I was after I gave the piece a second, final clean before sealing it with a coat of
Rust-Oleum Satin Clear Enamel.

I bought a multi-pack of matte boards with 8 x 10 openings and cut them to fit the pane openings. Two panes of glass from Ace Hardware and 6 pieces of hardboard cut by my husband rounded out my supply list for this project. I was ready to put it all together.

In each opening I secured glass, photo, matte board and hardboard using glazier points. A couple of d-ring hangers were added to the frame for hanging.