#11 Wrought iron garden chairs & footstools

Transformation cost: $23

These two chairs with footstools were curbside in a friend’s neighborhood when she texted me a photo. The conversation (which she started at 9:00 a.m.) went like this:

I justified my weak willpower by thinking I might keep these chairs for my own patio. However when I looked into buying cushions for them it looked cost prohibitive. Fortunately my dear friend Lori did a better job of finding affordable upholstery and claimed them for herself.

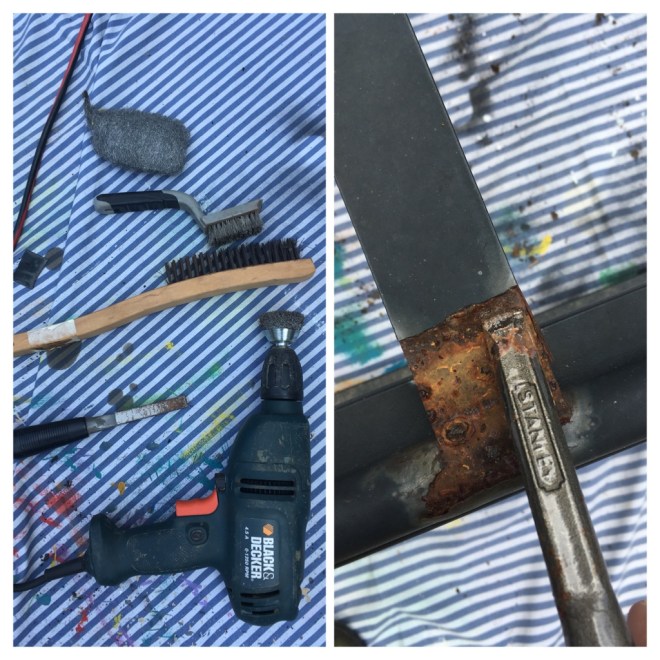
I began by having my husband assess the state of the furniture. A few swift kicks confirmed that, despite the rust spots, it was all still structurally sound. Using a chisel and various wire brushes I removed all the loose coating & rust.

After cleaning everything with a weak solution of soap and water I applied a coat of Rust-Oleum Rust Reformer to the spots where there had been rust.

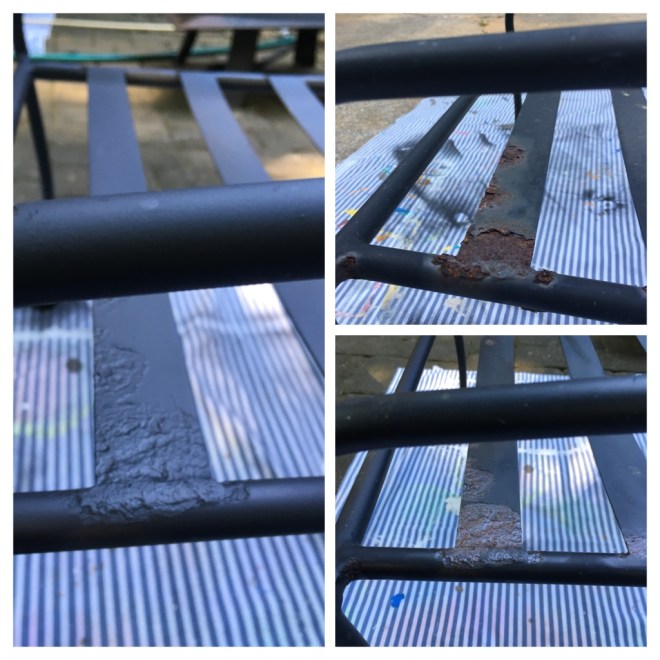
Already the rust spots were starting to look a lot better. (Top right: original, bottom right: after being scraped and brushed, left: after painting with Rust Reformer).

The finishing touch was to add several coats of Rust-Oleum flat black enamel.

Catching the morning sun on a neighbor’s deck

#10 Oak end table

Transformation cost: $37.39

I was a chalk paint virgin, I admit it! I know, any self-respecting person who’s been DIYing (that is a verb, right?) as long as I have should have used chalk paint a gazillion times by now but, what can I say?,
I guess I’m just late to the party. Anyway, with this piece it was time to venture into chalk paint territory. It was quite a departure for me; I pride myself in being a meticulous painter, and I can lay off like the best of them. After watching numerous Annie Sloan tutorial videos I went to work. Applying chalk paint was like going back to preschool; with a cylindrical brush I slapped it on in every direction, stabbing at it to get into all the nooks and crannies, being careful not to apply too much or to have any drips or runs. After the first coat it looked like the paint and the table had got into a brawl but after the second coat a lovely, flat, uniform finish was achieved. Waxing over the paint is the finishing touch to give it protection and a more dimensional look. I’m very happy with how this piece turned out, I will definitely be using chalk paint again!

I began by stripping the finish off the top of the piece to expose the lovely wood grain. It came off so nicely!

Next I color washed the top of the piece with a 1:2 mix of chalk paint:water. I brushed the wash on then removed excess with a rag until I got the depth of color I was looking for.

I then applied 2 coats of chalk paint to the rest of the piece.
At this point I decided I didn’t like how the color washed top looked against the base so I changed tack.

To finish the piece I went over the top with 2 coats of MinWax PolyShades Honey in a satin finish, I applied a coat of clear wax followed by a coat of white wax to the body of the piece, and I installed a new drawer pull.

#8 Book lover’s table

Transformation cost: $27.30

Even though the flat surfaces of this piece were ugly, beveled, veneered particle board, the tapered legs and upright pieces are solid wood with some attractive detailing. I instantly knew I could make it look elegant. A fortuitous accident with a paint finish resulted in exactly the look I was hoping for; a cracked, aged finish in elegant gold & heirloom white with (in places) touches of the almost black original color.

The first step was to remove one of the pieces of particle board; to be replaced later with something much more lovely.

I removed the legs and gave everything a good clean and a light sanding.

Next I applied a coat of Kilz Complete oil-based primer, followed by Rust-Oleum metallic gold paint, followed by Rust-Oleum 2X Ultra Cover in heirloom white satin finish.

When I applied the metallic gold paint it inexplicably wrinkled in random areas. I liked it so I left it and let it dry thoroughly before applying the top coat of heirloom white. When I went to age it with sandpaper, the wrinkling gave way to a beautiful cracked look.

To attach the new glass top to the rest of the table we would need screw holes. The glass supplier was going to charge $5 per hole so I enlisted my brilliant husband. With a spear-headed carbide drill bit, plenty of lubrication and patience he expertly made the four holes I needed.

The finishing touch was to install the new glass table top. The finished piece is a lovely, elegant table perfect for someone who wants to show off their reading collection!

#7 Sash window mirrored organizer

Transformation cost: $24.11

I’ve been dying to experiment with mirror paint so when a neighbor was discarding her old sash windows I knew this was my chance. I also chose this project to see if crackle medium works with spray paints.

First I removed hardware, metal stripping, and one of the two panes of glass. I then gave everything a good clean and, with the remaining glass protected, a light sanding.

I filled screw holes with wood putty and primed the exposed wood. When putty and primer had dried I applied a coat of Rust-Oleum Metallic gold paint to the front of the frame. I then added a piece of pegboard in the empty opening and secured it with some 1/4 square doweling.

Now for my crackle medium/spray paint experiment. I applied crackle medium over the gold paint and let it dry for 1.5 hours. When the top coat of Krylon Chalky Finish in Bonnet Pink went on – Nothing. Zip. Didn’t work. Note to self: Crackling doesn’t work when the top coat is a spray paint. Instead, after a couple of days, I lightly sanded the top coat to expose the gold paint underneath and give it a more aged look. I then gave everything a couple of coats of clear gloss enamel. I know some of you will be thinking “Why put gloss enamel over a chalky finish. Doesn’t that defeat the purpose?” Well, since my purpose was to use up this pink paint more than to have a chalky finish, it’s all good!

Now for my next experiment: My first encounter with mirror paint. Fortunately I read the can before starting or it could have been a disaster. The mirror paint is applied to the BACK of the piece of glass. In all honesty both sides ended up almost equally reflective but it’s obvious to me now that you don’t want the paint on the front where you’re going to clean!

I finished the piece with a sheet of hardboard on the back, to protect the mirror finish,
and a couple of multiple tool rack pegs.

#6 Gold frame

Transformation cost: $20

Sometimes the hardest thing to do is nothing but almost nothing is just what this piece needed. I had endless ideas for how to refinish this frame and what to put in it (chalkboard, cork-board, dry erase board, pegboard etc. etc.) but every time I went back to it I kept thinking the same thing: “It looks great the way it is and whatever I do to it might only make it worse”. In the end I came to the inevitable conclusion that all it needed was a good clean and some mirror glass.

More detail of the frame

#4 Wicker/wood storage chest

Transformation cost: $39.10

I’m so glad I chose to make this piece my first bespoke project; I’m sure I would not have upholstered the lid of this trunk had my client not wanted to use it as a window seat as well as a storage chest. The lid of this piece is a non-standard size and shape. A made-to-order seat cushion would have been very expensive so upholstering the lid was an obvious, win-win solution.
The color scheme in her office (white furniture, pale blue walls and hints of grey) was the basis of our paint and fabric choices.

I began by separating the base from the lid. After a good clean I applied 3 coats of
Rust-Oleum 2X ultra cover in semi-gloss white.

For the non-standard shaped lid I cut a piece of 1″ foam to fit then wrapped the lid and foam in batting.

I then covered the lid with our chosen upholstery fabric. By a stroke of luck I found a fabric whose design almost perfectly matched the design of the wood carving on the base.

Since the fabric pattern matched the wood carving so beautifully, the finishing touch was to hand paint the wood carving in colors to match the fabric.

And finally top and bottom were re-united.
Before the wood carving pattern was easily overlooked; now it gets all the attention it deserves!

Doing double duty as a window seat & storage chest in my neighbor’s home office.

#2 Plant pot

Transformation cost: $23.99

It took several passes before I could envision this pot as anything but gaudy. When I did finally pick it up in my truck (this sucker weighs 37 lbs – I was not about to carry it the half a block to my house) it rolled over and spilled dirt all over my truck bed.  However, knowing the value of a heavy, clay pot like this I decided it was worth giving it a second chance.

After a good scrub and a light sanding I applied the base coat of Behr “Outdoor Cafe” in semi-gloss.

I then applied crackle medium to everywhere but the rope detail

I let the crackle medium dry for about 1.5 hours (don’t wait more than 4 hours) before applying the top coat of Behr “Anime” in semi-gloss. This was my first attempt at a crackle finish and I had some reservations after reading accounts of failed attempts. It turned out well though. I think the secret is to apply the top coat as quickly as you can (try to not brush over any one spot more than once. That means loading the brush with quite a lot of paint) then walk away and let the magic happen!

At this point the top coat color I chose was paler and more yellow than I wanted so I applied some Sepia “Tint It” which gave it a slightly darker and more aged look.

I finished the piece with a couple of coats of Krylon Crystal Clear Enamel

Overflowing with a garden mum in Nov 2018