#36 French country-style chairs

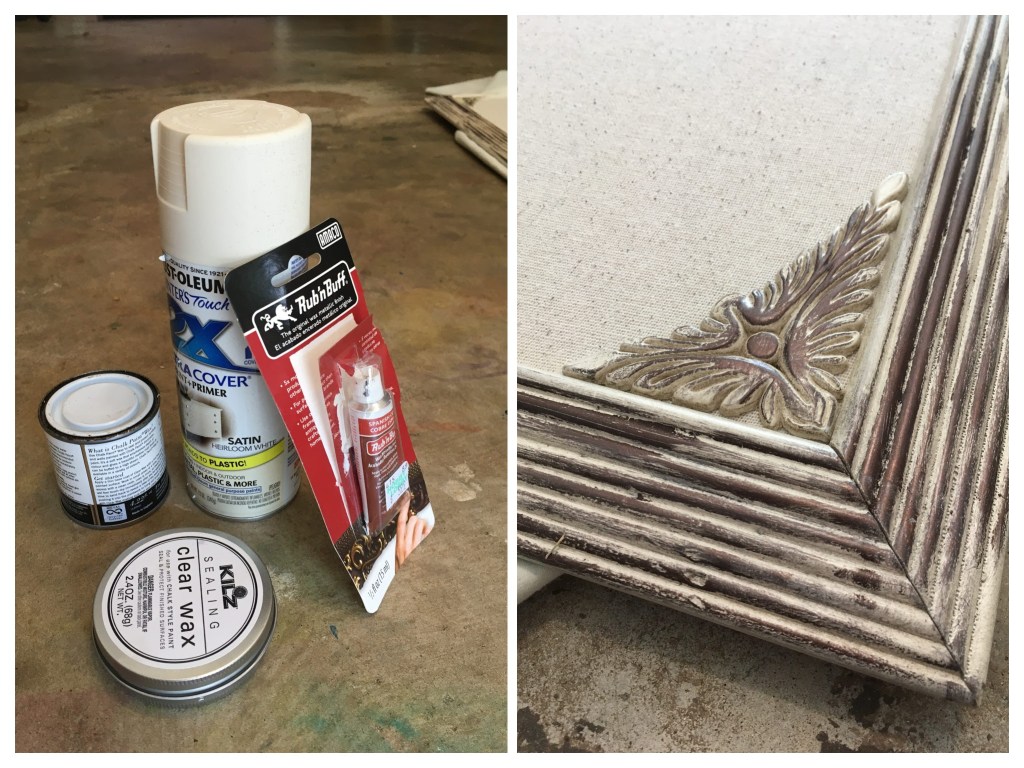
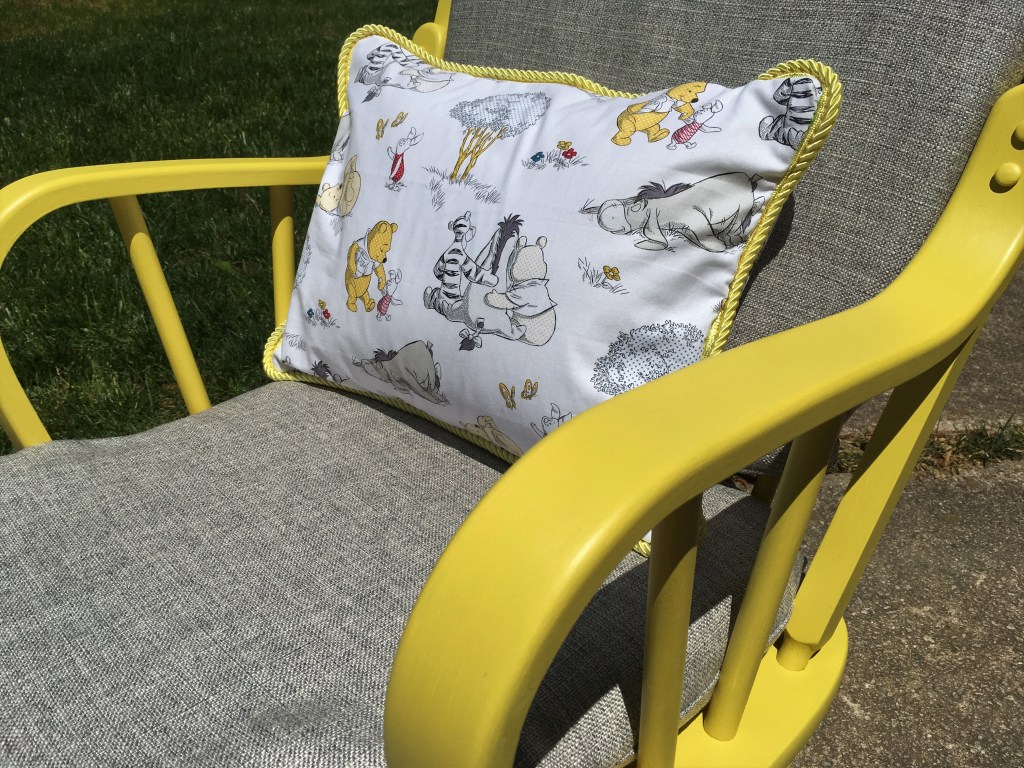
Materials used: Primer, chalk paint, clear wax, hardboard, upholstery fabric.

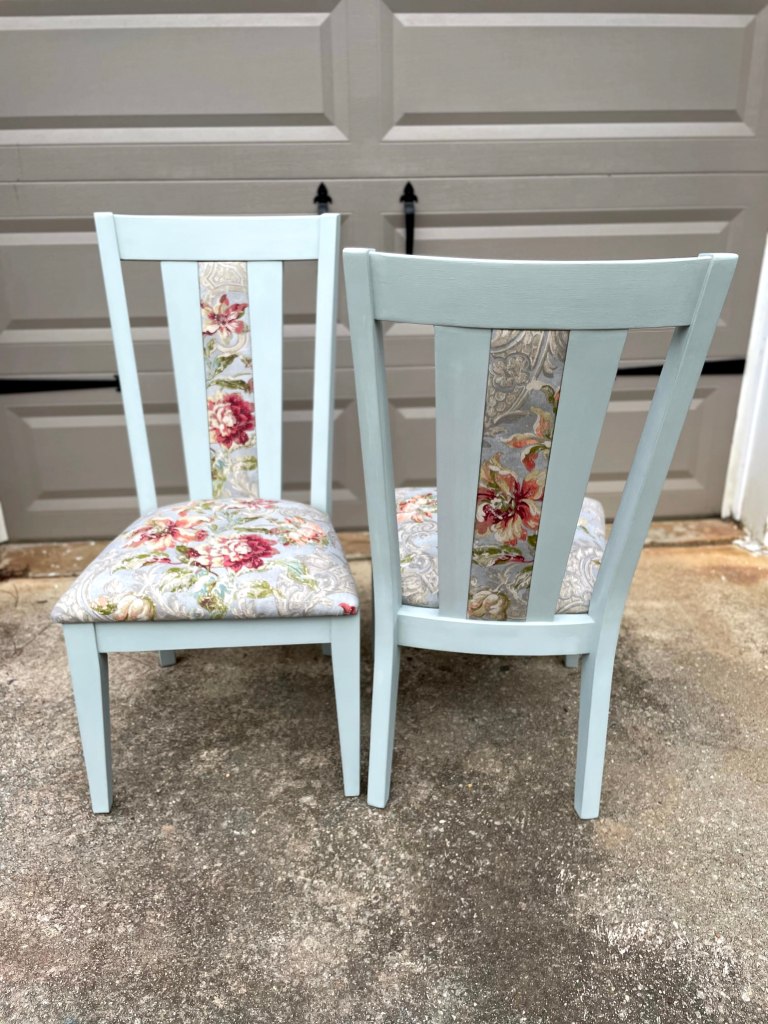
What attracted me to these chairs was the inlaid panels in the backrests. I knew if I could remove them it was an opportunity to have a little fun with some fabric I wanted to use.

First I had to make sure I could remove the “wooden tile”, inlaid panels. There were four all together: one in the front and back of each chair’s backrest. Sure enough they came out easily, as you can see in this 9-second video.

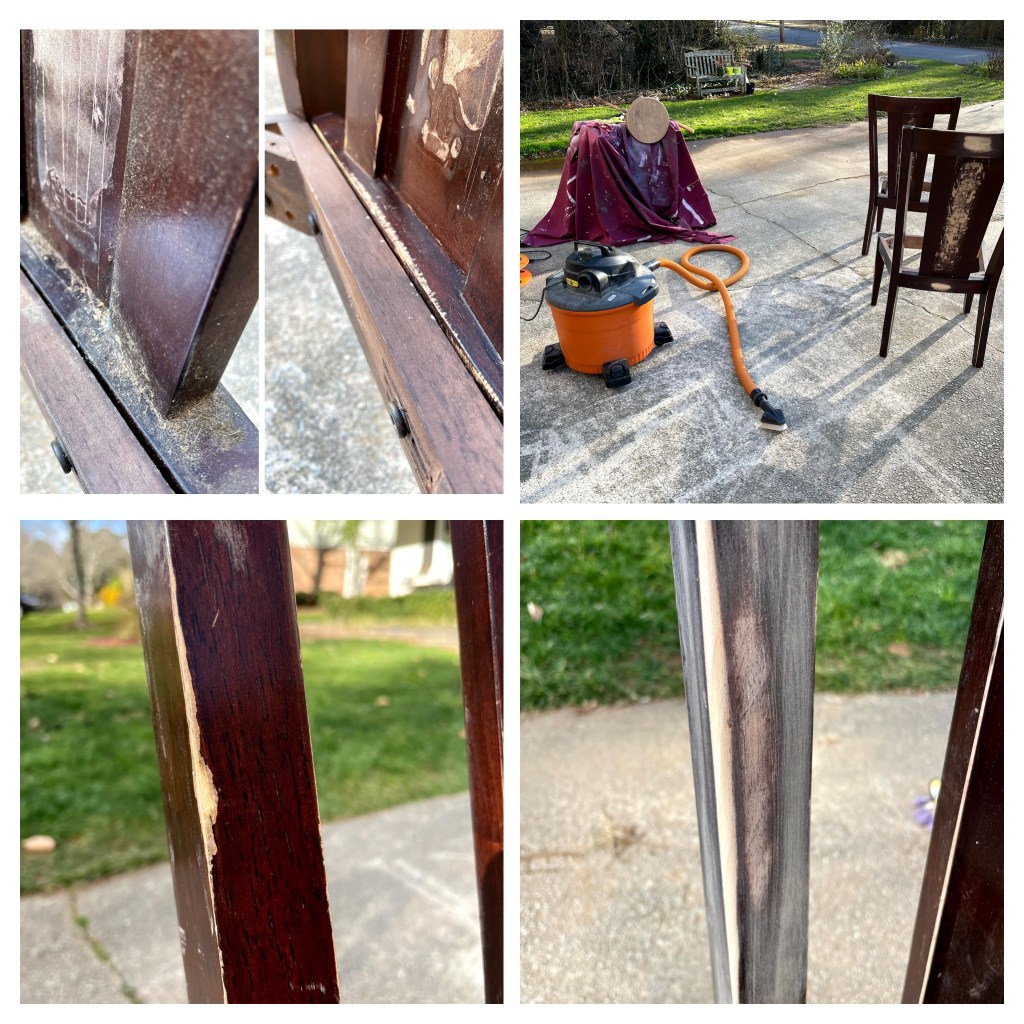
I then gave the frames a good clean, and sanded out a few dings.

After a couple of coats of primer, I applied three coats of chalk paint. I call this color Vintage Paris Grey; it’s a blend of leftover paints with those names. The paintwork was finished with two coats of Behr clear wax.

When the frames were done, it was time to tackle the upholstery. I started with the backrest panels. My handy husband cut four pieces of hardboard to fit the spaces. With spray glue I attached a thin piece of batting to each, then wrapped them in the upholstery fabric.

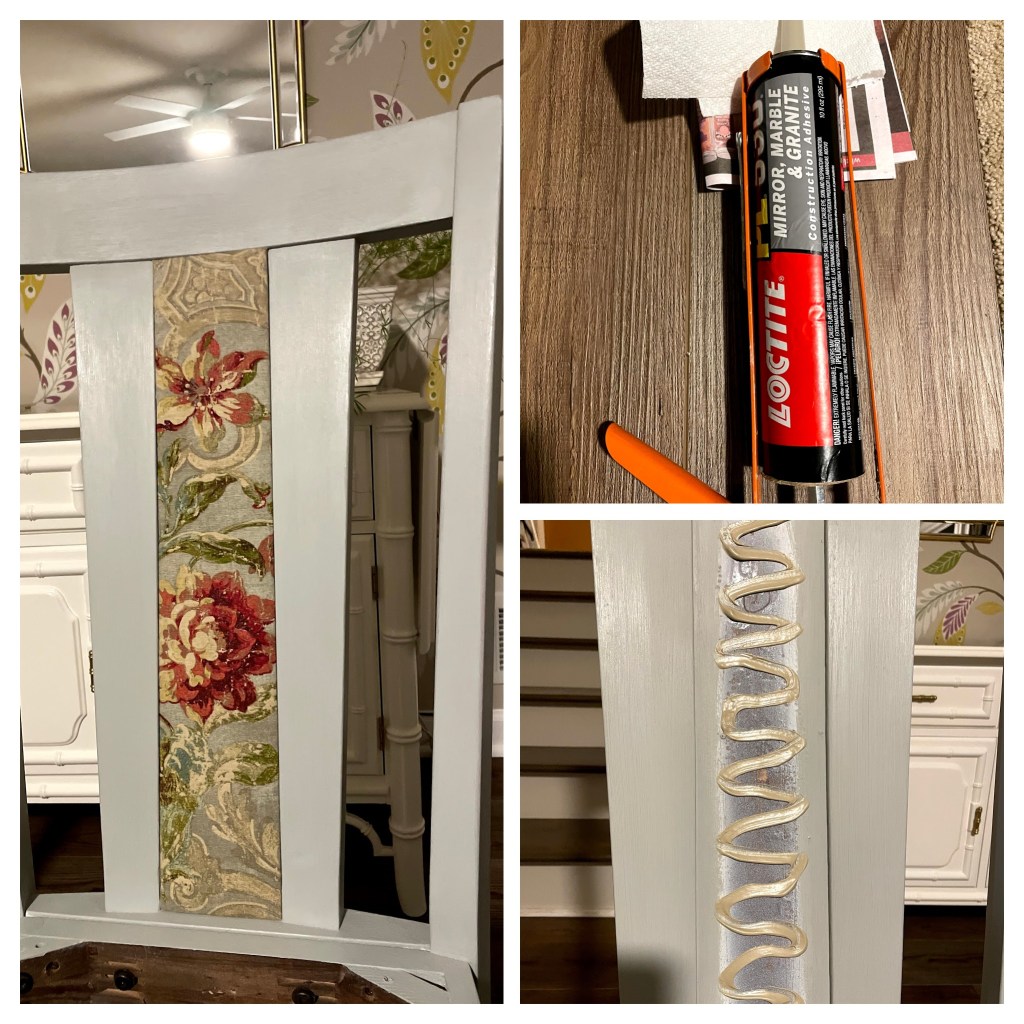
I re-attached the newly upholstered panels to the frames using Loctite mirror, marble and granite adhesive.

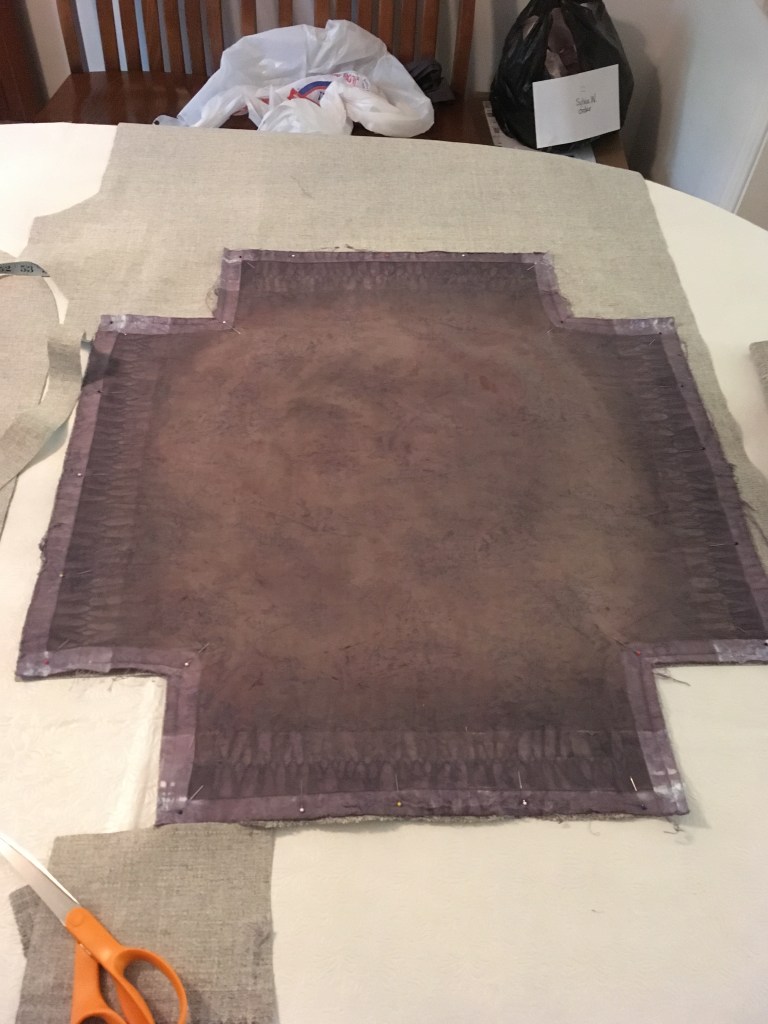
Under the old fabric the original seat pads were in such great shape I could re-use the foam and batting. I was even able to recycle the black cambric. With the old fabric as my pattern, I cut the new material, making sure to match the patterns on the two seats. I then covered the seat pads with the new fabric, and re-attached the black cambric. Then it was just a matter of attaching the new seat pads to the frames.

#31 The Sophia desk

Transformation expense: About $35

This was my first transformation done with an apprentice and it was a baptism of fire for 9-year old Sophia! By the end we had applied eight coats of paint and wax to this piece! The hurdles we had to overcome were good teaching moments, and the end result was well worth all the effort. My design inspiration was a refinished piece by The Resplendent Crow.

This desk is solid wood, and has some decent joinery, but had also seen its fair share of wear and tear.

Rolling up her sleeves, Sophia got to work cleaning the desk inside and out. We then sanded and used wood filler to repair the biggest imperfections, including a crack in the top.

Sophia chose a beautiful, pale blue color (Permafrost) for the Behr Chalk Paint. We applied the first coat and immediately ran into two serious problems: 1) When the desk was moved, the crack in the top re-opened and 2) Stain from the sanded surface was bleeding through the paint causing yellowing.

Fixing the recurring crack was made harder because the top could not be removed (a couple of wood wedges were gluing it firmly in place). To install a metal bracket across the joint I had to drill pilot holes down through the desktop because I couldn’t get a drill in from the underside. Once the stabilized crack and pilot holes were filled and sanded, we could move on to problem #2.

A couple of coats of Kilz oil-based primer sealed the surface and prevented any further bleeding of the stain.

Now we could go back and apply three coats of the beautiful pale blue chalk paint.

When the painting was finished we decided to take this desk to the next level by adding some stenciling to the top.

Two coats of clear wax give protection and a beautiful sheen to the finish.

Tea break!

Finally we were ready for the finishing touches: We removed all the painter’s tape, polished the whole surface to a lovely sheen, and re-installed the hardware, which had been cleaned and painted in Rust-Oleum white semi-gloss spray paint.

#30 Picture frame jewelry board

Transformation expenses: $35.74

A while ago we hired a dumpster during a landscape project. When neighbors threw in a perfectly good picture frame I grabbed it knowing it would be good for something. Months later some friends and I were browsing quaint shops after a lovely afternoon tea. One friend saw a jewelry board that she particularly liked and I offered to create something similar with this frame.

Keeping costs to a minimum was the biggest challenge on this project. For my design I needed:

  • 5/8″ dowel rod & plywood
  • Leather cord & 1 yd fabric
  • Decorative tacks & cup hooks
  • Wooden decorative appliques

Fortunately I already had these things left over from previous projects:

  • Spray paint
  • Clear, dark & metallic wax
  • Thin batting
  • Beads & craft paper

The frame was rather uninteresting so I embellished it with wooden appliques and a layering of paints and waxes. The frame, appliques and doweling were first painted with Rust-Oleum 2X Ultra Cover in Antique White. I also painted the brass cup hooks with Rust-Oleum Hammered spray paint in dark bronze.

I then applied clear wax, followed by dark wax, followed by Amaco Rub ‘n Buff metallic wax in Spanish Copper.

Meanwhile I wrapped the plywood with thin batting followed by a neutral fabric.

I secured the prepared plywood into the frame using panel pins. I then cut four equal strips of leather cord for hanging earrings. I punched holes in each end of them all and pairs of holes at intervals along two of the strips (for earrings with posts). These were then nailed to the board using decorative tacks and a bead as a spacer. For bracelet storage I attached a length of the painted doweling using the two painted cup hooks. Finally, more decorative tacks function as hangers for necklaces. The back of the frame is finished with craft paper and a pair of D-hooks for hanging.

#22 Queen bed

Transformation cost: $30.07 (disclaimer at bottom of page)

Ordinarily I would not take on a piece this big due to space restraints. However when my son moved into a student apartment, taking his bed with him, we found ourselves with a guest bed void at the same time that a neighbor was discarding this piece. It turns out this bed has a delightful history: Apart from being the owner’s childhood bed it also accompanied her and her husband to England when he was stationed there for a while. It seems fitting for an Englishwoman to be responsible for its make-over.

Step 1: The habitual cleaning.

Step 2: Sanding. Although sanding is not necessary when using chalk paint, this piece had some chips and dents that I wanted to smooth out.

Step 3: Painting. Once the piece was properly prepped I began applying Annie Sloan’s Paris Grey chalk paint.

Step 4: Distressing. After 3 coats of chalk paint I used fine sandpaper (400 grit) and a light touch to GENTLY distress the contoured parts of the bed. I deliberately was not heavy handed because I want this piece to look like it belongs in a chateau not a farmhouse.

Step 5: Waxing. I then applied 2 coats of clear wax, buffing after each coat. The piece now has a lovely waxy sheen instead of a flat finish. Isn’t it amazing how different this grey looks in the morning light?

The very last thing I did was to go back with some dark wax to add a trace more texture. You can barely see the darker wax which was my intention; again I didn’t want it looking too rustic. Applying dark wax so lightly is not as straightforward as you might think. When it first goes on it is very distinct. The way to cut it back is to have some clear wax and a clean, dry cloth on hand. Once the dark wax is on use a different brush to apply clear wax on top and blend. If there is still more distinction than you want take the cloth and simply rub it off until you get the coverage you want.

DISCLAIMER: The cost shown above is the cost to me which (especially on chalk paint projects) is often less than market price. This is because I always have left-over materials from previous projects. For example: On this piece I used a negligible amount of Annie Sloan dark wax that I already had. The cost of a small can of that wax is $17 but I did not factor it into this project.

#21 Hekman coffee table

Transformation cost: $20.50

When a neighbor was discarding this table I almost didn’t take it because it is large and heavy and I was short on storage space. I’m glad I changed my mind because it is going to be perfect for the large living room my son will have in his shared apartment. Also, it’s incredibly robust so will hopefully withstand the wear and tear from four 19-year old boys.

Markings on the underside of the table quickly revealed its distinguished heritage. Despite knowing the manufacturer and serial number, my internet searches for more information have been fruitless. However, I will rest with the knowledge that a similar Hekman coffee table would today cost upwards of $500, and that “Now, almost a century old, Hekman is widely recognized as one of America’s premier furniture suppliers.” (excerpt from http://www.hekman.com/our_history)

Removing the worn and damaged finish on the table top was my first priority. Once I had also cleaned the legs with a mild soap solution, the piece was ready for its new finishes.

First was Annie Sloan “Coco” chalk paint. I applied three coats to the legs.

I then sealed the chalk paint with one coat of clear wax. Once it was dry and buffed, I applied a second coat of clear wax, followed by Annie Sloan dark wax. By working the brush and using more clear wax as needed, I got exactly the look I was going for. Once it was dry, I finished by buffing the legs one more time.

For the table top I began by applying a coat of MinWax stain & polyurethane in honey satin. I had intended to finish the piece with one or two more coats of this product, but changed my mind. I so liked the look of it after just one coat I decided to switch to an oil-based, clear, satin polyurethane to finish the job.

Two coats of clear, satin polyurethane gave the piece the protection and sheen it needed

#19 Glider rocker with ottoman

Transformation cost: $73.51 (which includes $16.21 for the throw pillow)

Without doubt this was the most challenging and time consuming project I have worked on so far. Were it not for these two things I might have quit: 1) I had a special client: A dear friend’s daughter who is expecting the family’s first grand-baby 2) I never quit! I’m really a very stubborn person and when I start something I am pretty determined to see it through. There were times when I wasn’t sure I could finish it in time or to the standard I like to set. In the end my perseverance paid off and when it all came together I finally fell in love with the piece.

When I saw that a neighbor was discarding this furniture set I quickly thought of my friend’s expectant daughter. A little research showed that it was a project worth doing; a similar piece by this manufacturer would retail for >$400.

Apart from worn out cushion covers, some slats missing from the ottoman, and some scuffed paintwork, the piece was generally in good condition. The only repair it needed was to a crossbar on the chair.

The theme for this piece was to be “Winnie The Pooh” with a yellow, gray and white color scheme. In the end I went with Annie Sloan chalk paint (not the paint pictured here) in English Yellow.

First order of the day was a thorough cleaning with a weak soap solution. Although you don’t have to sand a surface before applying chalk paint I did smooth out some blemishes in the paint finish and sand the very polished factory finish on the arms of the chair.

It transpired that painting a glider rocker and ottoman is nigh on impossible. Fortunately I’m always up for a challenge but my resolve did waver as I painstakingly applied coat after coat after coat. Fortunately by the third coat (which I applied with a wax brush rather than the regular paintbrush I had been using) I got the uniform look I was aiming for.

But the ordeal was not over! I still needed to add 2 coats of clear wax to give protection and a lovely sheen to the finish.

Once the painting was complete my husband added the slats that were missing from the ottoman

To replace the cushion covers I used the old, unpicked covers as a pattern guide for the new fabric. A brand new throw pillow in the feature fabric brings together all the colors of the piece.