#34 Antique Victorian Empire-Style sofa

Transformation expenses: $24.82 plus upholstering costs

This beautiful turn-of the twentieth century sofa was a family heirloom that got crowded out and was languishing in a basement. Thankfully its owners contacted me before sending it to the thrift store. And thankfully I found a family that saw its potential and was willing to pay for professional upholstering. I think the result is a spectacular, happy ending.

This sofa’s upholstery was outdated, torn, and still had hay and horsehair stuffing. It seriously needed an update! Apart from some previous repairs and some damage to the veneer, the frame (with its original casters) was in reasonable shape and really just needed cleaning and restoring. The first step was to take it to the upholsterer and get the old upholstery removed.

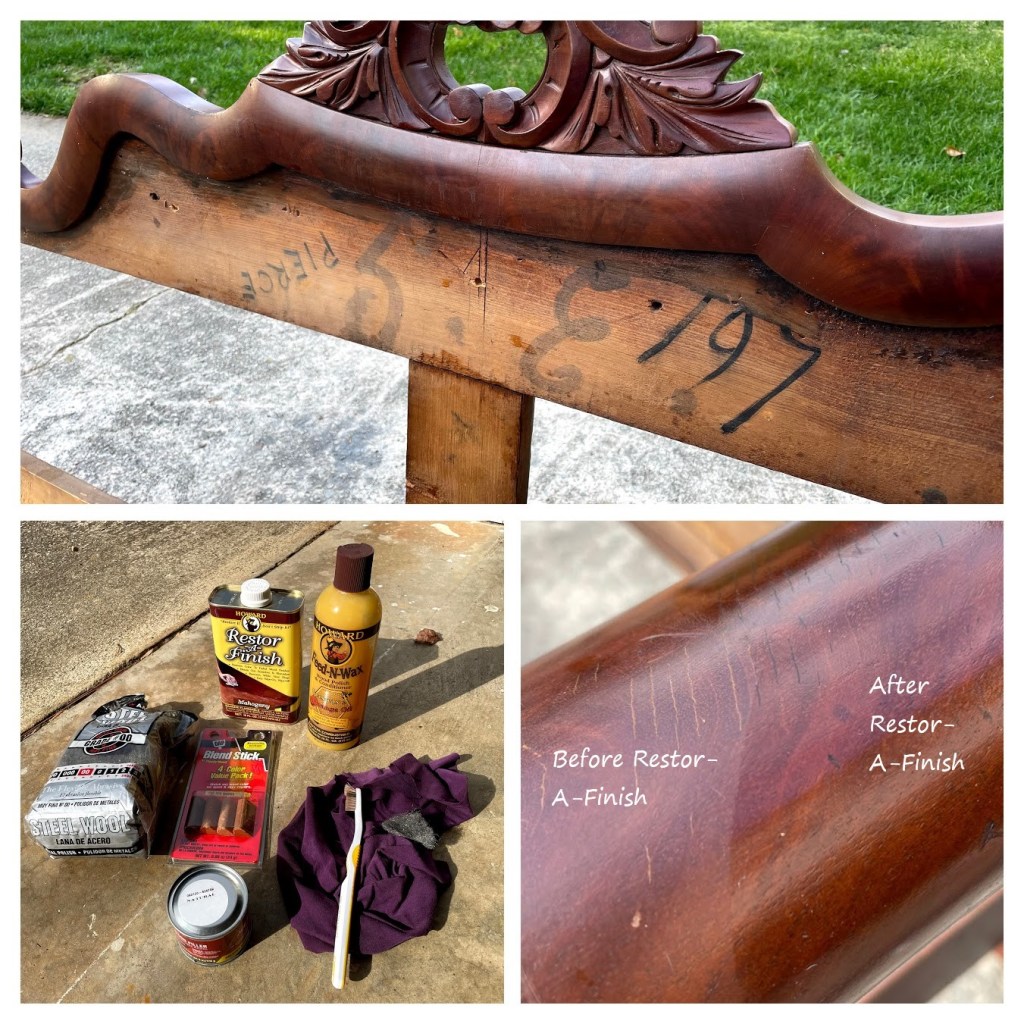
Once the frame was stripped bare I vacuumed and cleaned away the dust, dirt, and cobwebs. Then I pulled out my trusty refinishing tools: Howard’s Restor-A-Finish (mahogany), Howard’s Feed ‘n’ Wax, fine steel wool, clean rags, a toothbrush, and a wood finish repair kit.

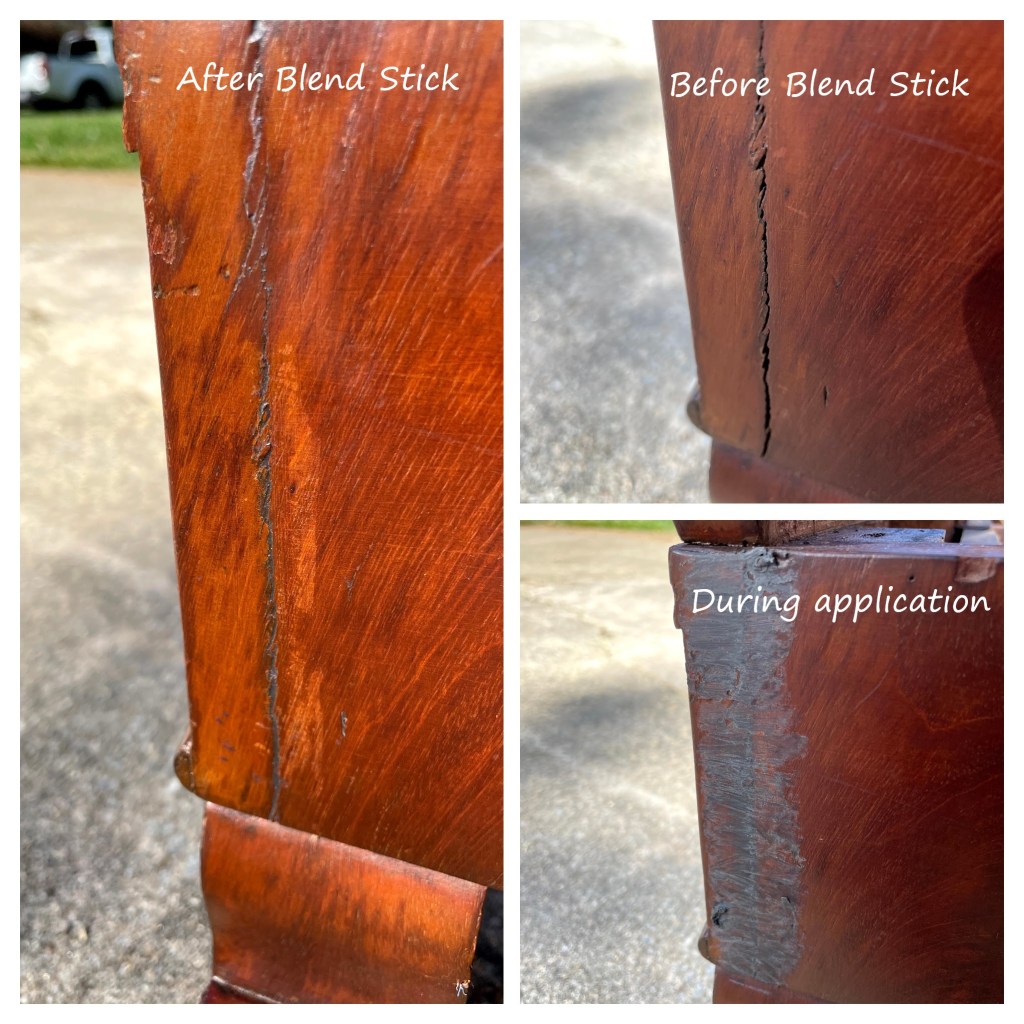
Restor-A-Finish blended out the smallest scratches and (with the careful use of some fine steel wool) removed the scuff and paint marks. I went back to the bigger cracks and scratches with a black Blend Stick and a dark furniture marker.

When the scratches, cracks, and dings had all been treated I finished with a coat of Feed ‘n’ Wax to restore a beautiful glow.

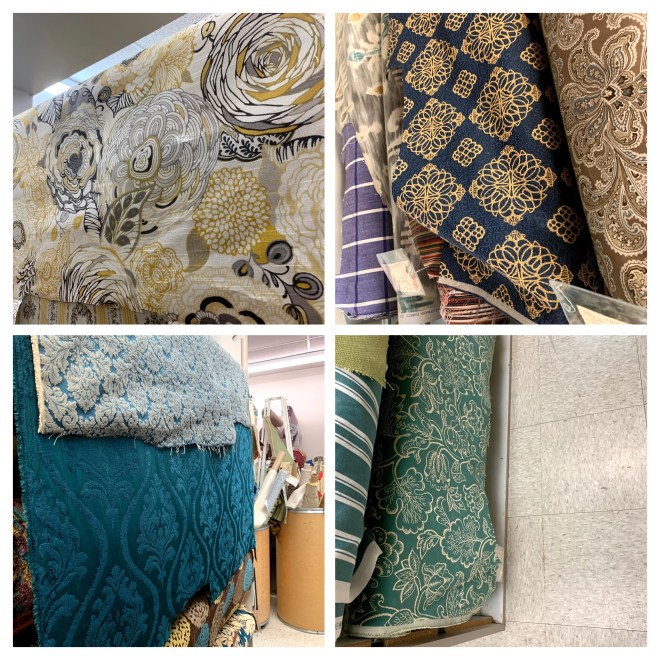
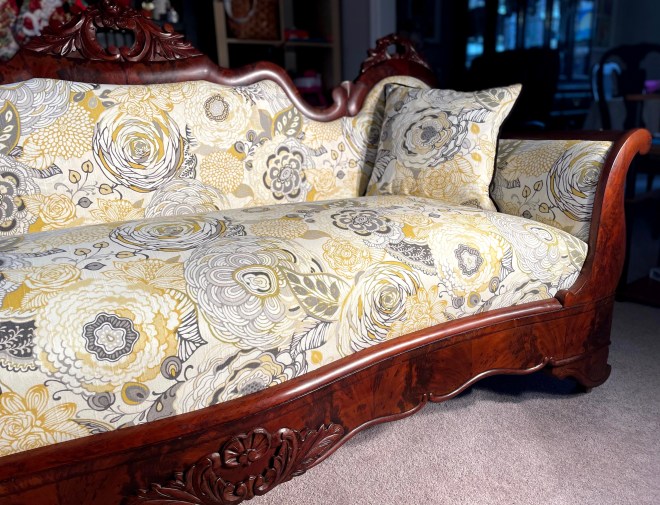
Meanwhile the new owner went fabric shopping. Amongst these and other options her eye kept going back to the one top left, which we decided to call “Modern Rose”. The pattern compliments the rose carvings on the frame perfectly, and the grey/yellow color scheme is a personal favorite of hers. We chose black velvet for the outside back and sides and included matching pillows trimmed with black velvet cording.

The final leg of the journey was back to the upholsterer to put it all together.

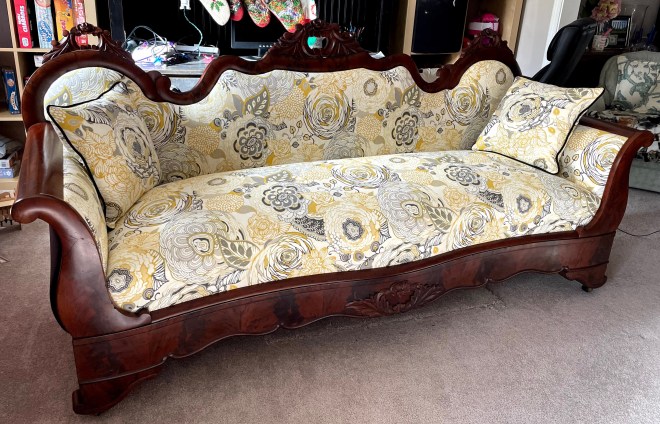
The end result is a beautiful blend of the rich wood tones and the new fabric, which is the perfect balance of neutral/vibrant and modern/traditional.

#29 Antique Queen Anne-style dressing table

Transformation expenses – $55.46

This circa 1910 dressing table was put to the curb just yards from my house! Its beautiful, long legs drew my attention immediately. Despite being disguised in paisley fabric I knew it could look amazing just because of its fine lines.

I secretly liked the fabric-covered look but it had been very badly done and was falling off in places. A lot of it just peeled away and the rest came off after a little dampening.

I was delighted to find the top and drawer fronts in pretty good condition, but other parts of the piece were seriously damaged, including a leg that had obviously been broken and shoddily repaired.

After much research and deliberation I realized it would not be worth attempting a full restoration so I decided on a combined restore & refinish approach. I started by restoring the drawer fronts, which have a beautiful tiger maple veneer. Fortunately the fabric adhesive came off with a dilute soap solution and did not require any solvent. Once they were cleaned, I used Howard Restor-A-Finish in walnut followed by Howard Feed-n-Wax oil-based wood conditioner.

The Chippendale-style drawer pulls were so tarnished they were nearly black (top right). I considered leaving them that way but realized they would complement the restored drawer fronts more if they were refreshed. I set about polishing them, only to find they are brass plated, not solid brass. The Bar Keeper’s Friend I was using removed some of the brass plating (top left) but all other gentler approaches I tried were ineffective. I decided to go ahead and polish them all then touch them up with Rust-Oleum’s Metallic in gilded brass (bottom).

When it came to the table top, allowing myself to refinish rather than restore had a couple of advantages: For one thing it would have been impossible to remove the adhesive without damaging the old finish and for another I could now use a more modern, durable ,and practical polyurethane. I got back to the bare wood using stripper and sandpaper. I then applied Rust-Oleum wood stain in American Walnut, followed by 3 coats of Varathane polyurethane in semi-gloss. The color perfectly complements the drawer fronts.

Finally it was time to tackle the frame and legs. The biggest challenge of this piece was the adhesive used to attach the old fabric covering. It behaved differently on every different surface. Some mineral spirits thinned it out in places but would not remove it completely. In the end there was nothing for it but to sand it off. Using 150, then 220, then 400 grit sandpaper I eventually removed all traces of adhesive. I used professional wood filler to repair some dings, cracks, and damaged veneer.

Once all the cavities were masked off ,I applied primer followed by two coats of Rust-Oleum Canyon Black in satin finish. The piece was then ready to reassemble.

#26 Pair of solid oak rocking chairs

Transformation expenses: $120.16

This pair of rocking chairs was no doubt discarded because the herringbone cane was falling apart, and the cost to replace it is prohibitive (around $500 per chair). However it seemed a shame to throw the baby out with the bathwater so I picked them up and contemplated a more economical solution.

The caning in both chairs was damaged beyond repair. There was no choice but to remove it all. Being able to take out the seat pads made the job a lot easier.

Pressure washing the frames to remove the ingrained dirt was possibly the most fun I’ve had on a project to date. The difference was amazing!

Pressure washing was hard on the wood and patches of the original finish were still there so a good bit of sanding was needed. I used 80 then 150 then 220 grit sandpapers to bare and smooth the wood.

The first of two more economical solutions was to replace the backrest caning on each chair with new spindles. We started with a 9ft long piece of 2″ x 1″ oak. My husband rounded the edges with a palm router then cut four spindles of the right length.

I attached the new spindles using doweling joints at the top rail and 3″ screws through the bottom rail. The frames were now ready for staining.

Before staining I treated the chairs with Minwax pre-stain conditioner. I then applied Minwax gel stain in mahogany to match my client’s front door.

Two coats of Minwax indoor/outdoor Helmsman Spar Urethane in clear satin finished the woodwork.

The second solution was to replace the cane seats with woven rush seats. Armed with a 10 lb reel of fiber rush, the necessary tools, and a really good instructional video I took on the challenge. You can find the video here and I am happy to share my learning curve with anyone who wants to attempt this themselves.

The seats turned out great. To finish them off ,and provide as much protection as possible, I applied 3 coats of shellac (50:50 solution in denatured alcohol) top and bottom.

Finally, I applied slip resistant tape to the unfinished bottoms of the rockers, reattached the seats to the frame, and the job was done!