#37 Tufted cow print ottoman/stool

Materials used: Upholstery fabric, fabric-covered buttons, weed barrier, stuffing, 8″ furniture legs.

Back in February 2019 I picked up a second-rate occasional table made of a plywood top on what looked like a bar stool. I separated the top from the bottom and, in April 2019, transformed the bar stool bottom into a Bistro Table. More than two years later the second part of this 2-part transformation is finally complete! Initially I envisaged transforming this plywood circle into a large, framed mirror but I love it as an ottoman/stool instead.

I began by re-purposing another freebie found on our local Buy Nothing Facebook page: A very large Urban Outfitters floor pillow which yielded four trash bags of upholstery stuffing and enough heavy duty fabric to make a liner.

To get the legs and tufting buttons in the right places, I made a newspaper template.

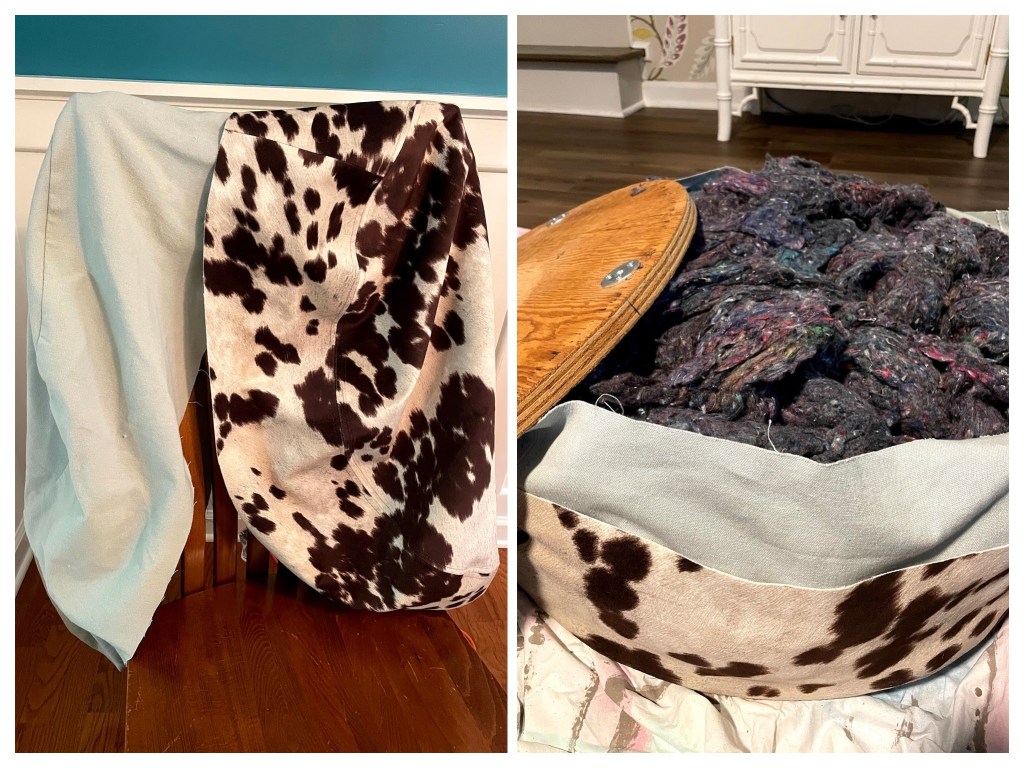
Once I had cut and sewn the liner and outer cover I inverted them both and stuffed them with the upholstery filling.

I compacted the stuffing by sitting on the plywood while pulling the fabric taut and stapling it. When everything was secured in place I set about doing the tufting armed with some very large upholstery needles and band-aids. The fabric-covered buttons are secured on the back side by tying the thread through a regular button.

The finishing touches were felt pads on the legs and a fitted piece of weed barrier to cover the upholstering and the leg hardware. Who knew that stretchable weed barrier would be as good an alternative to cambric, if not better?

#16 Lyrical bar stools

Transformation cost: $19.47

I love it when a piece is commissioned; it brings about an outcome that often is not my first vision. These stool are a case in point. I initially envisaged these with a sports theme but when my client wanted musical instruments, and a nod to her husband’s Irish heritage, the idea of wood-burning was born. Beyond just a few characters I had never done wood-burning before but now I’m hooked!

I began by removing the finish from the tops of the stools to create
clean backdrops for the wood-burned images

Next I cleaned and sanded the legs. A previous sloppy paint job had left patches of white paint on the underside of the seat. Rather than try to remove them and then refinish the wood I decided to paint over them. I used painters tape to mark out geometric shapes then sanded those areas too. After several coats of Krylon Gloss Emerald Green spray paint (what better color for someone whose ancestors are from the “Emerald Isle”?) the legs were almost finished.

As a finishing touch (to make the stools more hard-wearing) I used vinyl tubing to cover the lower stretchers. I simply cut pieces the length of the stretcher, made a slit the full length of the piece then wrapped it around the painted wood.

Now I turned my attention to the seats. I created transfers by tracing printed images (embellished with some of my own artwork) onto parchment paper. Another nod to Ireland was adding the shamrock to the drum set image and the Celtic symbol for family to the guitar. Once the reverse side was also traced (so I wouldn’t transfer a mirror image) I transferred the designs onto the stool tops.

To finish the seats I applied 3 coats of oil-based, clear, gloss polyurethane for maximum protection.