#25 Mini chandelier birdfeeder

Transformation cost: $12.60

I have my constipated dog to thank for this find. We were taking a long walk to get “things” moving and our route took us past this treasure. A chandelier was TT#1 (Chandelier) and I was excited to find another to work on; they make such good garden decor.

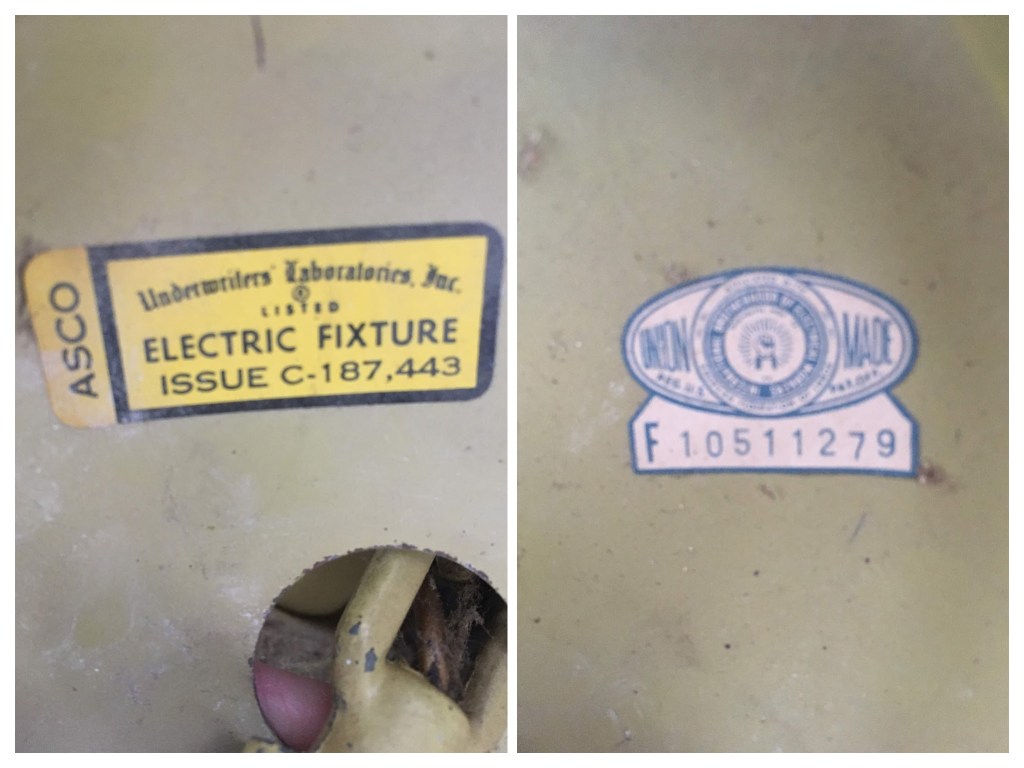
I am convinced this is a vintage piece but I’ve had mixed feedback to my enquiries. The International Brotherhood of Electrical Workers says this fixture was made in Newburgh, New York in October 2013 (according to the serial number). However, Underwriters’ Laboratories Inc. says it must be at least 25 years old because they stopped using that font on their labeling 25 years ago.

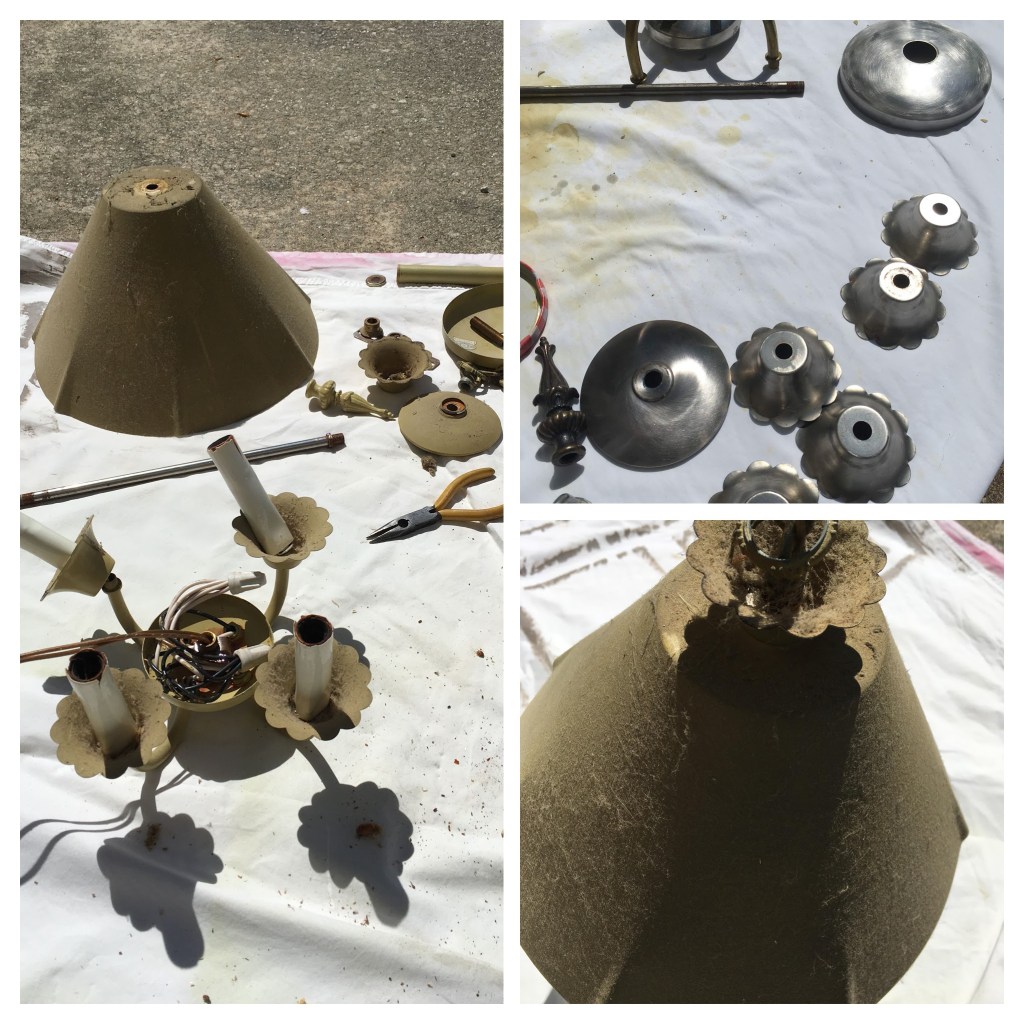
As I began cleaning the dismantled piece some of the paintwork dissolved and what was left peeled and cracked. Using acetone, a rag and a toothbrush I was able to remove all the paint completely.

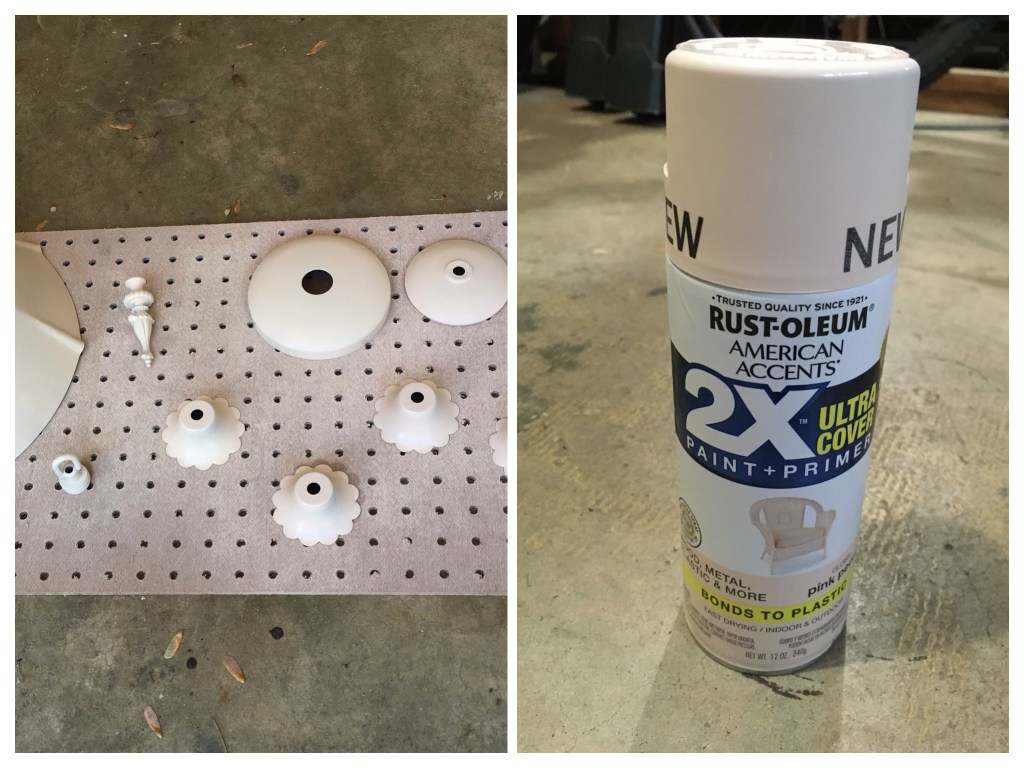
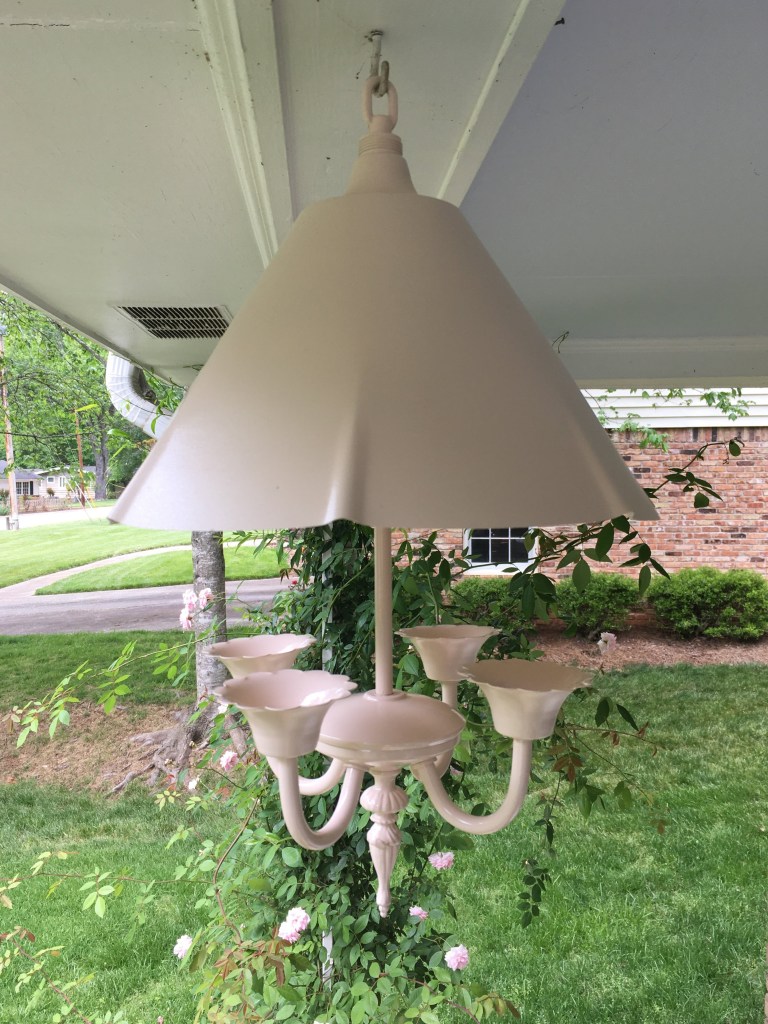
The bare metal parts were now ready for their finish coats of Rust-Oleum 2X Ultra Cover gloss in pink peony. I made sure to reserve some paint for finishing touches after reassembly.

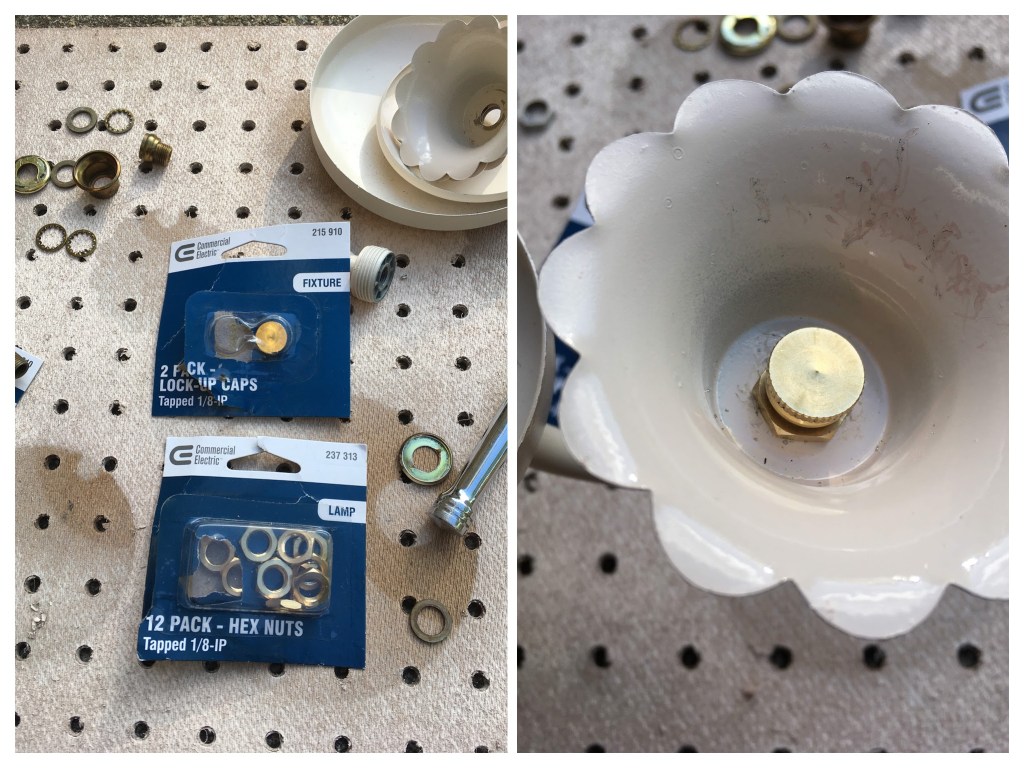
When it came to putting it back together I made a few changes. First I used lock up caps to seal the part of the arm that would have attached to the candle tube. I discarded the canopy and inverted the top bobeche so that rain water wouldn’t pool in it. The hanger loop neatly tops it off. I finished the job by touching up with the remaining paint.

#23 Ocean Mist table

Transformation cost: $19.02

This piece reminded me of TT#8 (The Book Lover’s table), which I completed back in February 2018. They are made of similar materials and are assembled in a similar way. Oddly enough I had the exact same setback with both pieces!

I had no qualms about painting the piece and decided to have a little fun with it. The Gothic arch shaped indentations on the front were my inspiration.

The supplies I needed for my arch inspired design were RustOleum Ultra Cover (Paint + Primer) spray paint in ocean mist gloss finish and a color-matched sample of Behr latex paint.

Next, the usual sequence: Disassemble. Clean. Sand. Mask. I put extra effort into the sanding because I would be applying a gloss finish that would highlight every flaw. A nail hammered into the top of each leg made it easier to clamp them for painting.

The paint was going on beautifully until it wasn’t! In certain areas the paint started to wrinkle, just as it had with the Book Lover’s table. Whereas with the Book Lover’s table I made lemonade out of lemons, this piece was destined for a different look. There was nothing for it but to let the paint dry thoroughly, sand away the wrinkles, and try again.

When all the components had been reworked to my satisfaction, I was ready to start on the design. I made a template from the indentations and used it to pencil my design on the table top. It was starting to look like a Paint by Numbers kit.

With the color-matched sample and some white paint I already had, I mixed six different shades of the Ocean Mist color and began hand painting.

Some time later ……. I locked in the finished design by adding a few coats of gloss lacquer over the hand-painted areas.

Finally, I cleaned the original hardware with some Bar Keeper’s Friend and put everything back together.

#16 Lyrical bar stools

Transformation cost: $19.47

I love it when a piece is commissioned; it brings about an outcome that often is not my first vision. These stool are a case in point. I initially envisaged these with a sports theme but when my client wanted musical instruments, and a nod to her husband’s Irish heritage, the idea of wood-burning was born. Beyond just a few characters I had never done wood-burning before but now I’m hooked!

I began by removing the finish from the tops of the stools to create
clean backdrops for the wood-burned images

Next I cleaned and sanded the legs. A previous sloppy paint job had left patches of white paint on the underside of the seat. Rather than try to remove them and then refinish the wood I decided to paint over them. I used painters tape to mark out geometric shapes then sanded those areas too. After several coats of Krylon Gloss Emerald Green spray paint (what better color for someone whose ancestors are from the “Emerald Isle”?) the legs were almost finished.

As a finishing touch (to make the stools more hard-wearing) I used vinyl tubing to cover the lower stretchers. I simply cut pieces the length of the stretcher, made a slit the full length of the piece then wrapped it around the painted wood.

Now I turned my attention to the seats. I created transfers by tracing printed images (embellished with some of my own artwork) onto parchment paper. Another nod to Ireland was adding the shamrock to the drum set image and the Celtic symbol for family to the guitar. Once the reverse side was also traced (so I wouldn’t transfer a mirror image) I transferred the designs onto the stool tops.

To finish the seats I applied 3 coats of oil-based, clear, gloss polyurethane for maximum protection.

#15 Bulldog bulletin board

Transformation cost: $19.12

Having abandoned a sports theme on another project I decided to do it on this bulletin board instead.

I began by printing two copies of a Georgia Bulldog image and spray gluing them onto contact paper. I then used a craft knife to cut out all the black areas on one image and all the red areas of the other to create two different templates. I was careful to include “bridges” on the black template so it would hold together until it was on the board

Next I applied the black template to the center of the cork board, masked off the remaining area and sprayed several coats of Krylon Short Cuts Flat Black spray paint.

When the black paint was dry I covered all but the frame.
After priming I applied several coats of Krylon Short Cuts Gloss in Red Pepper.

Now it was time to add more red. I applied the red template over the previously painted bulldog. Then I divided the corkboard into three equal width vertical stripes. With the frame and the center strip (except the template) masked, I applied several coats of Krylon matte Poppy Red spray paint.

I finished by strengthening the flimsy frame with L-brackets at each corner and some additional staples to secure the cork inside the frame.

#14 Heritage “Cameo II” end table

Transformation cost: $17.82

When my friend Renate saw this piece roadside she instantly contacted me and I rushed to pick it up. At first glance I knew it was a beautiful, quality piece and, on further investigation I was validated. Made in May 1976 by Heritage furniture in Drexel, NC it was part of the Cameo II collection. The catalog boasts: “Superb fruit-wood finishes complement rich grafted and pin knotty walnut veneers and pecan solids”. The pieces in the collection were originally sold in either a wood or a custom (painted) finish. Knowing that made me less reluctant to apply some paint to the piece.

The table top had some nasty water/paint/crayon marks so I began by removing the finish on the top.

Next I gently sanded the top and wiped it with a damp cloth.
The rest of the table got a light sanding and a cleaning with a mild soap solution.

After meticulously masking certain areas, the piece was ready to paint.

Starting with the underside I applied 3-4 coats of Rust-Oleum 2X Ultra Cover in Heirloom White, satin finish.
Once upright the rest of the piece got the same treatment.

I then gently distressed the Heirloom White finish and sealed it with Rust Oleum Satin Clear Enamel

To finish the top I applied 3 coats of a clear gloss oil-based polyurethane. The grain of the walnut veneer came up beautifully!

#12 Bevelled mirror with ornate frame

Transformation cost: $7.93

When a friend was discarding this mirror I initially resisted the urge to bring it home. However, I couldn’t stop thinking about the potential of this piece. With a weakened resolve I went back the next day to lift it from her driveway. This mirror originally had a gilded frame that had been painted matte black, perfect for adding depth and layering to the finish!

After a thorough cleaning (a toothbrush was a real necessity for this piece) I protected the mirror glass with newspaper

Once clean the first coat I applied was Rust-Oleum Metallic Silver specialty metallic paint

Following the Metallic Silver I began adding coats of Rust-Oleum 2X Ultra Cover in Heirloom White satin finish.
After spraying each coat I used a rag to wipe the paint off the raised parts of the frame.

After 3 coats of Heirloom White (each one followed with wiping) I had the look I wanted: A varied, layered look that (in places) goes all the way down to the original gilded finish.
The finishing touch was to apply some clear wax which I then buffed with a clean, dry rag to give some sheen.

#5 Safari chair

Transformation cost: About $18

Just a day after my last post it snowed, and some of that snow still has not melted; it hasn’t exactly been ideal weather for painting and there’s been little to no progress on any transformations! Fortunately I have this little ace up my sleeve. I do feel slightly like I’m cheating with this post since this transformation took place in May 2015, more than 2 years before I started this blog. However, it is an old favorite of mine and it does meet all the criteria to count towards my goal. I picked up the chair from a neighbor’s trash and transformed it into an end-of-year teacher gift. My inspiration came from the fact that Africa was part of this teacher’s Social Studies curriculum. 

I had recently painted a zebra tissue box cover for my BFF in England
(and then one for myself) so I had some practice painting an animal print.

I started by cleaning the chair then lightly sanding it and applying primer.

The animal prints were painted with 4 or 5 different colors of acrylic craft paint.

Two coats of polyurethane finished the job.

#1 Chandelier

Transformation cost: $15.95

Having admired a chandelier hanging from a tree on a recent garden tour, I didn’t hesitate to snatch up this piece. Apart from a fairly decent layer of grime it was in good shape and didn’t need a lot of work.

I started by discarding the shades, bulbs and shafts that were sheathing the bulb holders.

These bulb holders were supposed to unscrew nicely but the little buggers wouldn’t budge.

Sometimes you just need more WD40 and the help of a friend even more stubborn than yourself.

I have to admit pulling out all the wiring “guts” was oddly satisfying.

Removing the grime and adding candles was the finishing touch